使用python3实现基于华为云的动态解析(ddns)
在群晖中安装python3及pip https://blog.cosdk.com/archives/1797
实现思路
在华为云上添加动态解析域名 解析地址随意写
使用bs4解析ip38页面获取公网ip存入本地文件
使用requests访问华为云提供的RESTAPI接口 用用户名密码换取token(Token的有效期为24小时)
用获得的token访问解析更新api接口
比较写入本地文件中的ip与新获取到的ip是否相等,如不相等则更新获取到的新公网ip
每隔一段时间轮询检测
代码实现
# coding = utf-8
# nohup python3 -u main.py > main.log 2>&1 &

import json
import time
import os
import urllib.request, urllib.error

import requests
from bs4 import BeautifulSoup

# ddns解析域名
domain = 'blog.cosdk.com'
# 华为云账号
name = 'username'
# 华为云密码
password = 'password'
# 进入管理控制台\我的凭证 选择一个项目名称
scopeName = 'cn-east-2'
# 进入域名解析页面 查看url找到zoneid=abcd....& 部分 abcd...即为zone_id的值
zone_id = 'abcdefg'
# 首次运行不填写 运行一次后会在在控制台打印出值
recordset_id = ''


# 配置到此结束运行 python3 main.py 试试看

def init():
    # 获取动态公网ip与上次获取ip比较,不同则需要更新ip
    req = urllib.request.Request(url='http://www.ip38.com/', headers=headers)
    html = urllib.request.urlopen(req)
    bs = BeautifulSoup(html, 'html.parser')
    ip = bs.select('#ipadcode .one-three a')[0].string
    f = open(os.path.join(os.getcwd(), 'ip.txt'), 'r', encoding='utf-8')
    txt = f.read()
    if ip != txt:
        f.close()
        setIp(ip)
    else:
        print(time.strftime("%Y-%m-%d-%H_%M_%S", time.localtime()), 'ip未发生变化')


def setIp(ip):
    # 获取token
    data = {
        "auth": {
            "identity": {
                "methods": [
                    "password"
                ],
                "password": {
                    "user": {
                        "domain": {
                            "name": name
                        },
                        "name": name,
                        "password": password
                    }
                }
            },
            "scope": {
                "project": {
                    "name": scopeName
                }
            }
        }
    }
    headers['Content-Type'] = 'application/json'
    res = requests.post(url=getTokenUrl, data=json.dumps(data), headers=headers)
    status_code = str(res.status_code)
    if status_code != '201':
        print(res.text)
        print('请查阅https://support.huaweicloud.com/api-iam/iam_30_0001.html获取错误详情')
        return

    # 设置token
    token = res.headers['X-Subject-Token']
    headers['x-auth-token'] = token

    # 获取解析id
    if recordset_id == '':
        res = requests.get(url=getRecordsetUrl, data=json.dumps(data), headers=headers)
        if len(res.json()['recordsets']) == 0:
            print('请登录域名管理后台添加 %s 的A记录解析' % domain)
        else:
            print('%s 的id为:' % domain, res.json()['recordsets'][0]['id'], '请写入recordset_id字段中')
        return

    # 更新解析

    data = {
        "name": "nas.qianxiaoduan.com.",
        "description": "This is an example record set.",
        "type": "A",
        "ttl": 3600,
        "records": [
            ip
        ]
    }
    res = requests.put(url=domainUrl, data=json.dumps(data), headers=headers)
    print(res.text)
    # 存储本次更新的ip用于比较
    f = open(os.path.join(os.getcwd(), 'ip.txt'), 'w', encoding='utf-8')
    f.write(ip)
    f.close()
    print(time.strftime("%Y-%m-%d-%H_%M_%S", time.localtime()), 'ip已更新', ip)


if __name__ == "__main__":
    getTokenUrl = "https://iam.myhuaweicloud.com/v3/auth/tokens?nocatalog=true"
    getRecordsetUrl = "https://dns.myhuaweicloud.com/v2/recordsets?&type=A&name=%s" % domain
    domainUrl = 'https://dns.myhuaweicloud.com/v2/zones/%s/recordsets/%s' % (zone_id, recordset_id)
    headers = {
        'User-Agent': 'Mozilla/5.0 (Windows NT 6.1; WOW64) AppleWebKit/537.36 (KHTML, like Gecko) Chrome/63.0.3239.132 Safari/537.36 QIHU 360SE'
    }
    try:
        # 创建ip存储文件
        try:
            f = open(os.path.join(os.getcwd(), 'ip.txt'), 'r', encoding='utf-8')
        except Exception as result:
            f = open(os.path.join(os.getcwd(), 'ip.txt'), 'w+', encoding='utf-8')
        init()
    except Exception as result:
        print(result)
添加ddns解析
进入华为云域名管理后台添加域名A记录解析 ip地址随便写一个
安装依赖
进入群晖SSH安装依赖
pip3 install requests
pip3 install BeautifulSoup4
运行
直接运行
cd 到main.py存放目录 执行
python3 main.py
后台运行
nohup python3 -u main.py > main.log 2>&1 &
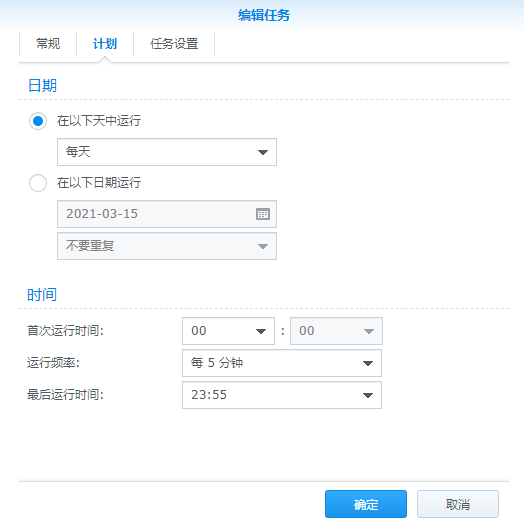
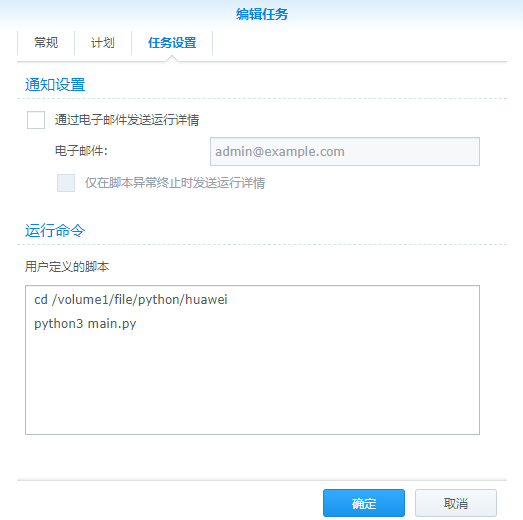
创建定时任务运行
进入群晖\控制面板\任务计划
新增\计划的任务\用户定义的脚本
设置任务执行时间

设置任务执行路径

